This section outlines the foundational structure of a LightScript integration, covering key technical requirements, real-world examples, naming conventions, and efficiency tips. It walks through the update loop, meter behavior, effect triggering logic, and highlights common pitfalls. Whether you're debugging, building from scratch, or maintaining someone else’s code, this guide emphasizes clarity, stability, and performance as the core standards of high-quality integrations.
Basic Layout
This section provides a quick overview of setting up a LightScript from a maintenance standpoint, with a focus on where problems typically occur and how to spot and fix bugs. We’ll start with a brief walkthrough of an ideal LightScript structure to get you familiar with the code, then cover troubleshooting, and finish with a FAQ.
The basic skeleton requires a <head>, <body>, and <script>. All meters and user control declarations go inside the <head>. All canvas declarations belong in the <body>. Everything else should be placed in the <script> section.
<head>
The <head> is one of the most critical and complex parts of any LightScript. A faulty user control or meter here can cause crash loops or disable itself and any meters declared after it.
When creating meters, you need to ensure:
- Perfect syntax (to avoid crashes and broken meters)
- No duplicate meter names (duplicates get overwritten)
- No meters extending beyond screen boundaries (causes crashes and errors)
- No missing or extra options in meters (leads to crashes)
- All meters include resolution adjustments (ensures consistent behavior)
Regarding resolutions, the most common aspect ratios are:
- 16:9 (3840x2160, 2560x1440, 1920x1080, 1600x900, 1366x768, 1360x768, 1280x720)
- 16:10 (2560x1600, 1920x1200, 1680x1050, 1440x900, 1280x800)
- 21:9 (5120x2160, 3440x1440)
By default, we use the resolution 2560x1440.
All LightScripts must support 16:9, 16:10, and 21:9 aspect ratios. While 4:3 doesn’t represent a significant portion of our user base, it should still be considered for future compatibility.
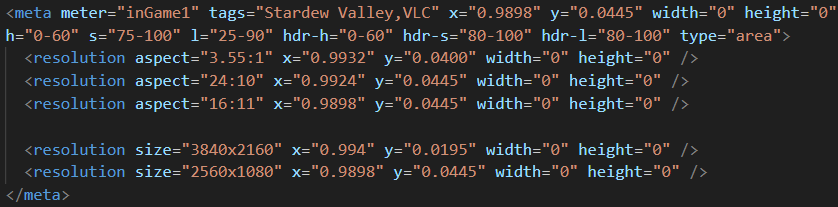
Here’s an example of the structure for a meter with multiple resolution settings:
The default location and size of your meters apply to every other resolution within the same aspect ratio. For example, if you originally adjust your meters to work with 1600x900, that meter should function properly across all other 16:9 resolutions. However, there are exceptions. Fortnite has multiple different metering positions even within the same aspect ratio, and some aspect ratios themselves can be misleading. For instance, 1366x768, a common resolution worldwide, is often listed as 16:9 but isn’t actually a true 16:9 ratio, which is not unusual. Similarly, ultrawide ratios like 21:9 rarely match their nominal dimensions. In my experience as an integration developer, I’ve never encountered an exact 21:9 resolution despite them being labeled as such. Because of this, each ultrawide resolution must be created, tested, and configured individually.
All adjustments must be placed between the opening <meta> and closing </meta> tags; otherwise, they won’t work. If your default meter is based on 16:9 and behaves consistently across those resolutions, you don’t need to add adjustments for other 16:9 resolutions. However, you must add entries for every resolution in other aspect ratios (such as 16:10 and 21:9), even if the ratio is consistent.
Finally, every meter except our OCR meters requires an HSL range to trigger. These ranges can be complicated by factors such as:
- Transparent UI elements
- Gradients in color areas
- Screen warping effects
- In-game menu openings
- UI adjustments per resolution
- Controller vs. keyboard use
- Video recording, which can introduce compression-related pixel errors
Basic instructions on HSL and normalized coordinates are covered in our developer docs and won’t be repeated here. Testing these meters will be discussed in the “Identifying Issues” section, but it’s important to stress this: the amount of testing needed to verify all meters perfectly is calculated as (number of meters) × (number of resolution adjustments) × (number of game modes) × (number of playable characters) × (length of an average game). This can easily add up to hours of verification per game, especially if practice modes or other workarounds aren’t available.
KEEP YOUR METERS EFFICIENT, our standard is perfection.
<body>
The <body> tag is where the actual canvas element is declared. It should always look more or less like the following example. The actual canvas id can be changed if you want, but make sure you fetch it correctly in the script.

Save yourself some time and copy-and-paste this.
<script>
Four things must happen inside this tag in every integration
- The canvas is fetched and used to create our 2D context.
- The initial update loop sets meter values, then recalls itself indefinitely to maintain them.
- The update loop keeps user control variables updated.
- Meters execute their callback functions when they are stable.
General Procedure
We’ve already set up the basic code skeleton. The next step is to walk through the execution loop that triggers effects from start to finish.
- The video game UI displays information in the form of colored bars, buttons, text boxes, etc. SignalRGB captures this data multiple times per second, but the actual capture rate depends heavily on the efficiency of your code. To be clear, a single loop or undeclared variable can break your entire script, and even crash SignalRGB. Worse, it’s easy to write code that technically works, but is so inefficient that it captures info at just 1-2 FPS.
- Each meter declared in the <head> must be as small and efficient as possible to reduce overhead. Do your calculations early and often; a meter that takes up 25% of the screen is never efficient. With OCR meters, capture individual letters instead of whole words. For health and mana bars, monitor only the essential segments. KEEP YOUR METERS AS SMALL AS POSSIBLE.
- Meters capture information that refreshes with each loop.
- Earlier, we covered the Meter class definition, which stores meter data and triggers a callback when the info array becomes stable. At the top of your script, declare all Meters in one block. You can organize or alphabetize them; just don’t bury them across thousands of lines. You’ll eventually need to tweak stability values, and it’s a waste of time trying to remember where you placed them.
- Inside the update function, these meters will receive values from screen-reading logic every loop. Their internal logic evaluates stability and, when stable, triggers their associated callback function.
- These callback functions should be declared in your script but outside the update function. Inside them, check the state of your Meter values (value, decreased, increased, diff) and use those to determine whether to play an effect animation. Structuring your code this way, rather than putting everything directly inside the update loop, enables us to build scalable integrations.
Real-World Example
Now that you have the general idea, I will quickly walk through a real-world example loop.
- I am playing the game League of Legends, which surrounds available skills with a bright yellow highlight.
- Each loop, the specific skill meter picks this color up as a value of "1" because it completely passes the meter’s HSL range.
- This "1" is passed to the Meter instance attached to the screen-reading meter and inserted into that Meter’s info array.
- If every value in that array is a "1", it is considered stable, and will activate the attached effect callback function. This callback function would also be activated if every value was a "0", or ".1" for instance; all the Meter cares about is stability. One important note here is that the callback function will not be continuously activated if the Meter is constantly stable at the same value – only stability with a NEW value will activate the callback.
- Once the callback function is executed, we arrive at some conditional checks – in this case, all we have to do is check if the Meter.value is "0", indicating a skill had been used.
- Since the Meter value is "1", we fail this check and will not play the skill effect.
- Several seconds later, I activate the skill and the yellow highlight around the button disappears.
- The new meter value is 0, which is passed to its Meter class.
- Once stability is reached, the callback activates and our conditional is passed, playing the skill effect. Latency depends entirely on the length of the Meter array, which you set at its declaration. More length means more latency and less false triggering, so be sure to test until you have found a good balance.
Naming Conventions
Screen-reading meters should have simple, clear, and descriptive names, always starting with a lowercase letter. Naming a health bar meter “healthBar” is excellent. Naming two meters “healthBarRed” and “healthBarGreen” when they track different colors in the same area is also great. But naming a small meter that only shows up during one hero’s ultimate effect something like “hrO21_yes” will only bring pain and suffering to anyone else trying to fix your code. Figuring out what a poorly named, tiny meter is tracking can literally take an hour of staring at individual pixels if you're unlucky, so don’t do this.
Meter class instances should be capitalized and end with the word Meter. Examples like “Q_Meter”, “TookDamageMeter”, and “TowerDestroyedMeter” are all perfectly fine. These should be clearly distinguishable from meters declared in the <head> section.
Effect functions should also be named as simply and descriptively as possible. Some games have hundreds of these functions; others might have fewer than ten. If multiple heroes have unique skills, include the hero's name as a prefix, like “SonaQ”, “ChamberE”, or “AshUlt”. In League of Legends, for example, there are functions like “DragonEffect”, “TowerEffect”, and “Q_Effects”, which contain multiple conditionals and are used by several meters. So, this kind of naming also helps with optimizing for scale.
Do not misspell words. If you're unsure how to spell something, look it up. Names must be clear and readable, regardless of who’s working on the code or how much time has passed. Organizing names alphabetically helps with quick lookup, especially if you’ll be editing that section often. While this level of organization isn’t required for the code to run, it makes a big difference for our maintenance developers.